Brushed vs. Brushless ESCs: Choosing the Right Motor Controller for Your Robot

Brushed vs. Brushless ESCs: Choosing the Right Motor Controller for Your Robot

Ever wondered what the deal is with brushed and brushless ESCs? You’re in the right spot! In this blog, we’re going to break down what these two types of electronic speed controllers are all about. We’ll look at how they work, the pros and cons of each, and help you figure out which one is best for your needs. Whether you’re into drones, robots, or RC cars, we’ve got you covered. Let’s dive in!

Table of Contents

Introduction

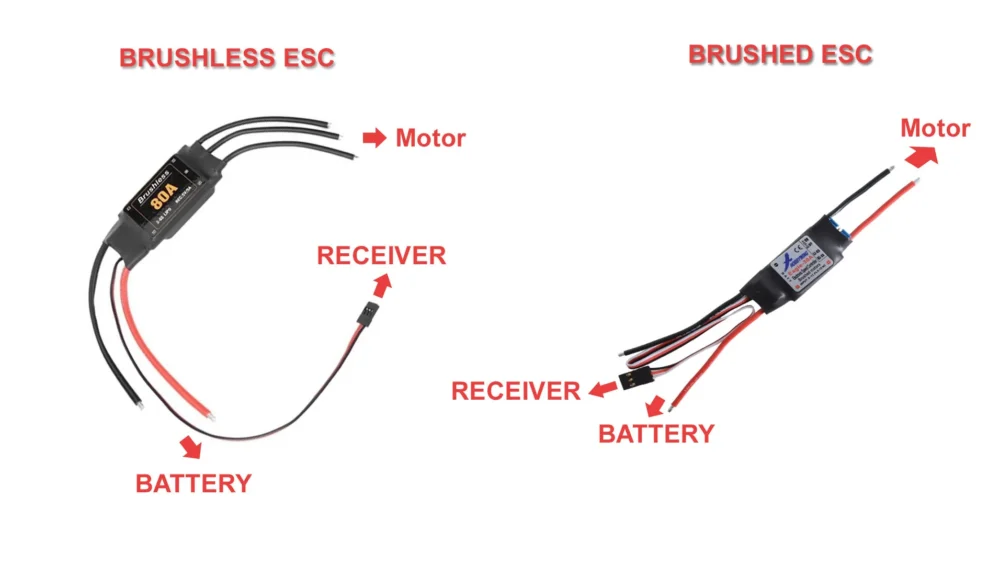
Are you confused about which ESC to choose for your motor? and What’s the difference in both types of ESCs? Lets clear the confusion in this blog. When it comes to controlling electric motors, there are two main options: brushed and brushless ESCs. These controllers are like the brain of the motor, determining how fast it spins and in which direction. But they work differently and have their own pros and cons. Let’s break it down simply, comparing brushed and brushless ESCs to help you decide which one is right for your project.


What are Brushed ESCs

So, a brushed ESC is like the old-school version of controlling motors. Instead of fancy electronic stuff, it uses good old mechanical commutation – you know, brushes making contact with the motor’s commutator. It’s kinda like how things used to work before everything went digital.

  • Uses Mechanical Commutation:
    So, instead of fancy electronic tricks, brushed ESCs rely on good ol’ physical brushes. These little guys make contact with the motor’s commutator, basically controlling the flow of juice through the motor.
  • Has Two Phases:
    Picture this: the motor’s got two phases, kinda like two separate power lanes. The ESC sends power through these lanes in a sequence, making the motor spin like a champ.
  • Low Frequency Current Switching:
    Unlike those high-pitched frequencies in brushless ESCs, brushed ones keep it chill. They switch the current at slower speeds because, you know, they’re dealing with mechanical stuff.
  • Designed for Brushed Motors:
    Think of brushed ESCs as the best buds of brushed motors. They’re tailor-made to boss around these motors, telling them when to speed up, slow down, or switch directions.

In a nutshell, brushed ESCs are like the laid-back cousins of the ESC world, using mechanical tricks, handling two-phase power, chilling with low-frequency currents, and hanging out exclusively with brushed motors.


What are Brushless ESCs

Brushless ESCs are pretty cool devices that helps control brushless motors, which are used in all sorts of fun gadgets like drones and RC cars. Here’s the lowdown:

  • Uses Electronic Commutation:
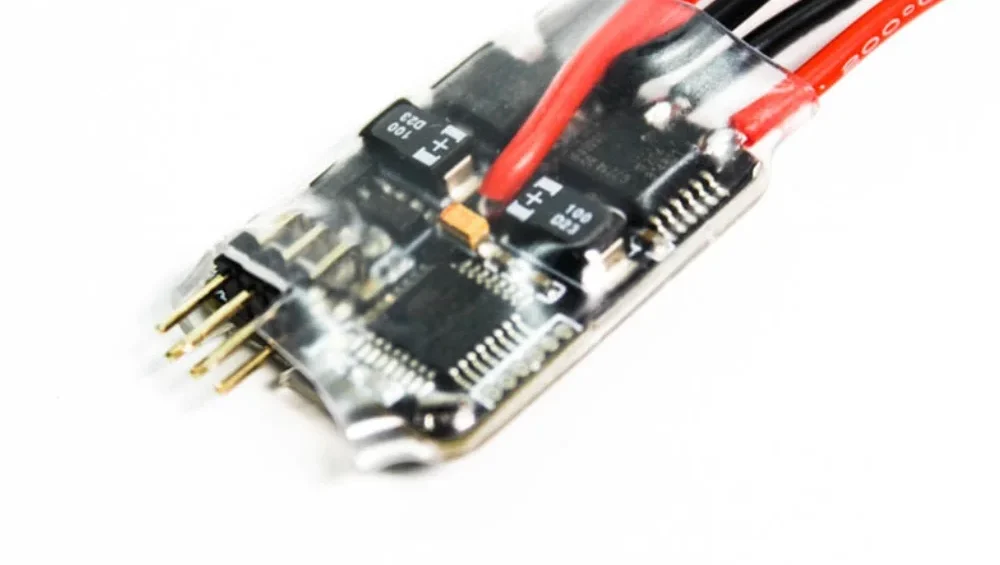
    Instead of old-school brushes and a commutator, a brushless ESC uses electronic commutation. Basically, it handles the power flow with electronics, so there’s no physical contact, making things run smoother and last longer.
  • Has 3 Phases:
    Brushless ESCs work with three-phase motors. This means they send power through three wires in a specific sequence, creating a rotating magnetic field that spins the motor. This setup helps with smooth and precise control.
  • High Frequency Current Switching:
    These ESCs rapidly switch the current on and off at high speeds. This high-frequency switching lets the motor respond quickly and efficiently to your commands, whether you’re speeding up, slowing down, or changing direction.
  • Designed to Control Brushless Motor:
    Brushless ESCs are made specifically for brushless motors. They take the signals from your controller (like a throttle or remote) and turn them into the precise power pulses needed to run the motor just right. This ensures everything runs efficiently and reliably.

In short, a brushless ESC is the high-tech brain that makes brushless motors so awesome, using smart electronic tricks to control the motor precisely and efficiently.

Still feeling confused? Here, let’s dive deeper into the advantages of both the ESCs over each other-

Advantages of Brushed ESCs over Brushless ESCs

Here’s why brushed ESCs are still rocking:

  • Low Cost:
    Alright, so brushed ESCs won’t burn a hole in your pocket like their fancy brushless cousins. They’re cheaper because they keep it simple with mechanical commutation instead of fancy electronics. If you’re watching your wallet, brushed ESCs are the budget-friendly choice.
  • Simple Design:
    Brushed ESCs are like the LEGO sets of the motor world – easy to figure out and fix. With fewer electronic bits and good ol’ mechanical commutation, they’re perfect for folks who like to tinker. So, if you’re into DIY projects or just like to keep things simple, brushed ESCs are your jam.
  • Compatible with a Wide Range of Motors:
    These babies are like the Swiss Army knives of ESCs – they work with pretty much any motor you throw at them. Whether it’s an old-school brushed motor or something more modern, brushed ESCs can handle it like a champ. That’s why they’re a go-to for all sorts of applications.
  • Smoother and Precise Low-Speed Control:
    Need to make your motor purr like a kitten? Brushed ESCs are your best bet. They’re pros at keeping things smooth and steady, especially at low speeds. So, whether you’re into robotics or scale modeling, brushed ESCs will give you that precision control you crave.

So, if you’re all about saving cash, keeping it simple, and getting smooth low-speed action, brushed ESCs are the way to roll!


Advantages of Brushless ESCs over Brushed ESCs

Alright, let’s get into why brushless ESCs are the ultimate choice:

  • Higher RPM:
    So, brushless ESCs can rev up the motor faster than brushed ones. Think of it like hitting the gas pedal in a sports car – you get that instant boost in speed.
  • Higher Efficiency:
    Brushless ESCs are like the energy-saving champs. Because they don’t have those clunky brushes causing friction, they’re more efficient. That means you can squeeze more power out of your battery without draining it as fast.
  • Smaller Size:
    These brushless ESCs are like the compact superheroes of the electronic world. They’re smaller and lighter because they don’t need all that bulky brush gear. Perfect for squeezing into tight spaces or keeping your drone nimble.
  • Quiet Running:
    Brushless ESCs are like the stealth ninjas of the motor world. They’re way quieter than brushed ESCs because they don’t have those noisy brushes rubbing against the commutator. So, if you’re into keeping things quiet, brushless is the way to go.

So yeah, if you’re all about speed, efficiency, compactness, and keeping things quiet, brushless ESCs are where it’s at!

Conclusion

So, to wrap things up, whether you go with brushed or brushless ESCs really depends on what floats your boat.

If you’re all about keeping it simple and saving some dough, brushed ESCs are the way to roll. They’re like the trusty old-school choice, perfect for DIY projects and offering smooth control at slower speeds.

But if you’re after speed, efficiency, and a sleek setup, brushless ESCs take the cake. These babies are like the high-tech superheroes of the ESC world, packing a punch with their higher RPM, efficiency, and compact size.

So, whether you’re cruising on a budget or aiming for top-notch performance, there’s an ESC out there to fit your needs. Just weigh your options, and happy motor controlling!


Click Here to buy the best ESCs for your motors now

Introducing the Electrocraze 6D: Power and Precision Combined

Introducing the Electrocraze 6D: Power and Precision Combined

We are delighted to be introducing the latest Electrocraze marvels: the newly released Electrocraze 6D, an exceptional ESC for beetleweight (1.5 kg) category.

What is Electrocraze 6D?

The advanced and powerful, Electrocraze 6D is brushed ESC specifically designed for beetleweight category bots. With input voltage of 15 Volts and output current of 6 Ampere and weighing just 10 gms it is perfect for beetleweight category bots. The 6 in 6D implies 6 Ampere and D implies Dual Channel which means it can independantly control two seperate motors each capable of managing its speed and direction.

Key Features

  • Dual Channel: The Electrocraze 6D ESC is equipped with dual-channel functionality, allowing independent control of two motors. This enables versatile and synchronized operation, ideal for applications such as differential steering in robotics or multi-engine drones.

  • Brake: With a built-in brake feature, the Electrocraze 6D ESC provides reliable stopping power for precise maneuvering and control. Whether you’re navigating tight spaces or performing quick stops, the brake function ensures smooth and controlled deceleration.

  • BEC: Featuring a Battery Eliminator Circuit (BEC), the Electrocraze 6D ESC ensures consistent and stable power distribution to your onboard electronics. Operating at 5 volts with a maximum output of 100mA, the BEC provides reliable power supply for uninterrupted operation.

  • Signal Range: Offering a signal range of 1100 to 1900 microseconds, the Electrocraze 6D ESC provides compatibility with a wide range of radio transmitters and receivers. This broad signal range allows for precise control and customization to suit your specific preferences and requirements.

  • Signal Loss Protection: The Electrocraze 6D ESC is equipped with advanced signal loss protection, safeguarding your vehicle against signal interference or loss. With fail-safe mechanisms in place, this ESC ensures stability and safety, even in challenging environments or unexpected circumstances.

In conclusion, the Electrocraze 6D ESC stands out as a powerful and versatile solution tailored specifically for beetleweight category bots. With its compact design, dual-channel functionality, and advanced features like brake and BEC, it offers unparalleled control and performance. The ability to independently manage two motors, coupled with a wide signal range and signal loss protection, makes it an ideal choice for various applications, from robotics to multi-engine drones. Whether you’re navigating tight spaces or maneuvering in challenging environments, the Electrocraze 6D ESC delivers reliable and precise operation, ensuring your vehicle stays on track and performs at its best.

Click Here to buy the Electrocraze 6D now.

Competition Prep: Combat Robotics | Essential Guide

Prepare your Robot and Team for competition

Preparing for a combat robotics competition requires thorough planning, preparation, and attention to detail to maximize the team’s chances of success. Here’s how to prepare the team and the combat robot for competition effectively:


Researching Opponents:

– Research and study potential opponents to gain insights into their robot designs, strategies, and strengths and weaknesses.

– Analyze past competition footage, read event reports, and engage with other competitors to gather information and develop counter-strategies.

– Identify common tactics and trends among opponents and brainstorm ways to counteract them with your robot’s design and strategy.


Practicing Driving Skills:

– Practice driving the combat robot extensively to develop proficiency and confidence in maneuvering and controlling the robot during matches.

– Simulate competition conditions as closely as possible by practicing in a controlled environment, such as a practice arena or testing grounds.

– Focus on mastering driving techniques, evasive maneuvers, and effective use of the robot’s weapon system to gain a competitive edge in matches.


Ensuring Compliance with Rules and Safety Regulations:

– Familiarize yourself with the competition rules and regulations to ensure that your robot complies with all requirements and restrictions.

– Review the event’s safety protocols and guidelines to ensure that your robot meets the necessary safety standards and passes inspection.

– Double-check all components, connections, and systems to ensure that they are in good working condition and comply with competition rules.


Fine-Tuning and Testing:

– Conduct final checks and inspections of the combat robot to ensure that it is in optimal condition for competition.

– Fine-tune the robot’s performance, settings, and configurations based on testing feedback and previous matches to maximize its effectiveness.

– Test the robot in simulated competition scenarios to identify any last-minute issues or adjustments that need to be addressed before the event.


Preparing the Team Mentally and Emotionally:

– Encourage team members to stay focused, positive, and mentally prepared for the challenges of competition.

– Manage expectations and maintain a realistic outlook on the competition, understanding that setbacks and surprises may occur.

– Foster a supportive and cohesive team environment, emphasizing teamwork, communication, and mutual encouragement throughout the competition.


By following these tips and strategies, the team can prepare themselves and their combat robot effectively for competition, increasing their chances of success and enjoyment in the exciting world of combat robotics. Remember to stay adaptable and resilient, and to embrace the spirit of competition with enthusiasm and sportsmanship.

Testing Your Combat Robot Basics | Step-by-Step Guide

Testing and Iteration

  1. Optimizing Functionality: Testing allows the team to evaluate the robot’s performance in real-world conditions and identify any areas for improvement. By testing various aspects of the robot’s design, mechanics, electronics, and control systems, the team can optimize its functionality for maximum effectiveness in competition.


  1. Ensuring Reliability: Testing helps uncover any mechanical or electrical issues that could affect the robot’s reliability during matches. By identifying and addressing potential failure points early on, the team can enhance the robot’s durability and resilience in the face of combat.


  1. Enhancing Competitiveness: Through iteration, the team can refine and fine-tune the robot’s design, strategy, and performance based on testing feedback. By making iterative improvements, the team can enhance the robot’s competitiveness and increase its chances of success in competition.


Approach to Testing and Iteration:


  1. Plan Testing Sessions: Schedule dedicated testing sessions in controlled environments, such as practice arenas or testing grounds, to evaluate the robot’s performance systematically. Define specific test objectives and criteria to focus testing efforts and gather actionable feedback.


  1. Evaluate Performance: During testing, assess the robot’s performance across various metrics, including speed, agility, maneuverability, weapon effectiveness, and durability. Record observations, measurements, and any issues encountered during testing for analysis and review.


  1. Identify Areas for Improvement: Analyze testing results to identify areas for improvement and prioritize changes or adjustments. Pay attention to recurring issues, weaknesses, or performance bottlenecks that need to be addressed to enhance the robot’s overall performance.


  1. Make Iterative Improvements: Based on testing feedback, make iterative improvements to the robot’s design, components, or strategy. This may involve modifying mechanical structures, optimizing electronics and control systems, or refining driving techniques to address identified shortcomings.


  1. Re-Test and Validate: After making changes or adjustments, re-test the robot to validate the effectiveness of the improvements. Compare performance before and after iterations to assess the impact of changes and ensure that they have the desired effect on functionality, reliability, and competitiveness.


  1. Iterate as Needed: Iterate on the testing and improvement process as needed, making incremental changes and refinements until the robot meets the team’s performance goals and requirements. Continuously seek opportunities for optimization and innovation to stay competitive in the dynamic world of combat robotics.


By emphasizing testing and iteration throughout the development process, the team can iteratively improve the combat robot’s functionality, reliability, and competitiveness, ultimately increasing its chances of success in competition.

Building Phase: Combat Robot Basic Guide

Build Your Combat Robot

Building a combat robot requires careful attention to detail and quality craftsmanship to ensure a robust and reliable final product. Here’s a breakdown of the construction process into manageable steps:


  1. Assembling the Chassis:

   – Start by gathering all the necessary materials and components for the chassis, including frame materials (e.g., aluminum, steel, or composite), fasteners, and tools.

   – Follow the design plans and CAD models to cut, drill, and assemble the chassis components according to the specified dimensions and configurations.

   – Pay attention to alignment, squareness, and structural integrity during assembly to ensure a sturdy and stable chassis.


  1. Mounting Components:

   – Once the chassis is assembled, begin mounting the various components onto the robot. This includes motors, wheels, weapon systems, electronics, and any other necessary hardware.

   – Use appropriate mounting hardware and techniques to securely attach components to the chassis. Consider factors such as weight distribution, balance, and accessibility when positioning components.


  1. Wiring Electronics:

   – Carefully plan and layout the wiring for the robot’s electronics system, including motors, controllers, kill switch, and power distribution.

   – Use high-quality silicon wiring, connectors, and insulation to ensure reliable electrical connections and minimize the risk of short circuits or electrical interference.

   – Follow wiring diagrams and schematics to route and connect wires neatly and efficiently, avoiding tangles or crossings that could lead to problems during operation.


  1. Integrating the Control System:

   – Install and configure the control system components, such as the radio receiver, transmitter, and BEC, according to the manufacturer’s instructions.

   – Test the functionality of the control system to ensure that all components are working properly and responding as expected.

   – Fine-tune control settings and calibration parameters to optimize performance and responsiveness during operation.


  1. Testing and Iteration:

   – Conduct thorough testing of the robot’s mechanical, electrical, and control systems to identify any issues or deficiencies.

   – Iterate on the design and construction as needed based on testing feedback, making adjustments to address performance issues, improve reliability, and optimize functionality.

   – Test the robot in controlled environments, such as a practice arena or testing grounds, to simulate competition conditions and refine driving skills and strategies.


  1. Attention to Detail and Quality Craftsmanship:

   – Throughout the construction process, emphasize the importance of attention to detail and quality craftsmanship.

   – Take the time to double-check measurements, alignments, and connections to ensure accuracy and precision in every aspect of the build.

   – Pay close attention to finish work, such as painting, polishing, or surface treatment, to enhance the appearance and durability of the robot.


By following these steps and emphasizing attention to detail and quality craftsmanship, the team can build a combat robot that is not only mechanically sound and electrically reliable but also visually impressive and competitively capable in the arena.

Designing a Combat Robot: Basics & Tips to Remember

Designing your Combat Robot

  1. Define Objectives and Requirements: Start by clearly defining the objectives and requirements of the combat robot. Consider factors such as weight class, competition rules, desired capabilities (e.g., speed, agility, durability, weapon effectiveness), and team preferences. This will serve as the basis for the design.
  2. Conceptualization and Brainstorming: Encourage team members to brainstorm ideas and concepts for the robot design. Consider different approaches, configurations, and strategies based on the defined objectives and requirements. Sketch out rough concepts and discuss their merits and drawbacks as a team.
  3. calculation- make calculations for drive system ,weapon system and battery system. various calculators available in market for these calculations. Please check drive calculator from ask Aaron, weapon calculator and battery calculation with gyro and bite angle calculations
  4. Research and Analysis: Conduct research on existing combat robots, competition strategies, and design principles. Analyze successful designs and identify key factors contributing to their effectiveness. Learn from past competitions and incorporate lessons learned into the design process.
  5. Create Detailed Plans and CAD Models: Once the team has settled on a conceptual design, translate it into detailed plans and CAD (Computer-Aided Design) models. Use CAD software to create precise 3D models of the robot, including its chassis, components, and weapon system. Pay close attention to dimensions, clearances, and integration of components.
  6. Iterate and Refine: Iterate on the design through multiple rounds of feedback, testing, and refinement. Solicit input from team members, mentors, and advisors to identify areas for improvement and address any issues or concerns. Make adjustments to the design as needed to optimize performance, functionality, and reliability.


Considerations for Specific Components:

   – Chassis: Choose a chassis design that provides a balance of strength, durability, and weight efficiency. Consider materials such as aluminum, steel, or composite materials, and design the chassis to accommodate other components and support the overall structure of the robot. Also make a market survey whether the components available to your local market or not.

   – Weapon System: Select a weapon system that aligns with the team’s strategy and objectives. Whether it’s a spinning blade, flipper, hammer, or other weapon type, design the system to deliver maximum impact while minimizing weight and power consumption.

   – Electronics and Control System: Design the electronics and control system to provide reliable operation and precise control of the robot. Consider factors such as wiring layout, component placement, and compatibility with the chosen radio control system.


By following these steps, the team can develop a well-thought-out and effective design for their combat robot, setting the stage for successful construction, testing, and competition. Effective design is key to building a robot that performs reliably and competitively in the arena.


Combat Robotics Team Budget Guide: How to Establish Yours

Importance of Budgeting:

  1. Resource Allocation: A budget helps team members allocate funds to different aspects of the project, such as materials, components, tools, and competition fees. This ensures that resources are used efficiently and that the project stays within financial constraints.
  1. Cost Management: Budgeting helps team members track expenses and manage costs throughout the project. By monitoring spending and sticking to a budget, teams can avoid overspending and prevent financial setbacks.
  1. Financial Sustainability: A well-planned budget promotes financial sustainability by ensuring that the project remains affordable and feasible in the long run. It allows teams to make informed decisions about investments and prioritize expenses based on available funds.

Tips for Prioritizing Expenses:


  1. Identify Essential Components: Start by identifying the essential components and materials needed to build a functional combat robot. These may include motors, batteries, chassis materials, and weapon systems. Prioritize spending on these core components to ensure that the robot meets basic functionality requirements.
  1. Research Costs: Research the costs of different components and materials to get a sense of how much each item will cost. Compare prices from multiple suppliers to find the best deals and consider factors such as quality, durability, and performance when making purchasing decisions.
  1. Allocate Funds Wisely: Allocate funds based on the importance and impact of each expense on the overall project. Consider factors such as the criticality of the component, its contribution to the robot’s performance, and the availability of alternative options.
  1. Budget for Contingencies: Set aside a portion of the budget for contingencies and unexpected expenses. Combat robot projects often encounter unforeseen challenges or setbacks that may require additional funds to address. Having a contingency fund ensures that the team is prepared to handle unexpected costs without derailing the project.
  1. Seek Sponsorship or Funding: Explore opportunities for sponsorship or funding to supplement the team’s budget. Reach out to local businesses, sponsors, or crowdfunding platforms to secure financial support for the project. Sponsorship can help offset costs and provide resources for purchasing components, tools, or entry fees.
  1. Optimize Spending: Look for ways to optimize spending and maximize the value of each amount spent. Consider options such as buying components in bulk, recycling materials from previous projects, or leveraging open-source designs and resources to reduce costs.

By budgeting effectively and prioritizing expenses, combat robotics teams can manage costs, stay within financial constraints, and ensure the successful completion of their projects. A well-planned budget sets the foundation for a sustainable and rewarding journey into the world of combat robotics.